United Kingdom

United Kingdom
Click on pictures for larger view, contact me at williams4x4@gmail.com

07 March 2010

Cooling system (With gruesome pics)

IMPORTANT UPDATE:
We are now starting to replace radiators on early (95 on) and later model P38s as well as Discovery 1-2 vehicles at a rapid rate.
If you own a P38 or Discovery 1-2 model then you need to consider if your cooling system is in top condition, if in doubt as the doc says seek urgent technical advice and still in doubt replace or service radiator either way.
A failing radiator will destroy a good engine in no time, at speed on a high way a burst pipe can cause severe damage in 15 seconds

and onto the original post.....

Cooling is very critical to the performance and life of any engine.
Any internal or external blockage of sorts can seriously damage the engine to a point that it becomes useless, in other words the engine can be written off due to heat stress damage etc, believe me this happens more often than you would care to think and it can and probably will happen to everyone at some point, care and attention will prevent this from happening to you now or in the future.

Additives to the cooling system like radiator block leaks etc are at best a very temporary solution and should not be left in the system for long no matter what the brand/manufacturer says on the container, remember they want to sell there product and we tend to believe what we read on these well packaged products.

Every cooling system should be flushed thoroughly every 2 years but more often in severe dusty environments, you may think the coolant reservoir is clear but its in the engine block where most if not all the dust and other debris settles to the bottom of the block creating hot spots.
Hot spots will then cause your engine to loose power and use more fuel, its a delicate balance that’s very often over looked by mechanics and DIYers in all sectors.

Having previously worked and qualified on Earth moving equipment like CAT, Komatsu etc we used to change water filters on service's...... now bare in mind these machines are not cheap to buy so it's no brain storm why they are fitted with these kind of filters to keep the coolant clear of harmful particles like rust, dust and other odd metal bits from the manufacturing process.
The Range Rover is no different or for that matter any other car brand.

Anti Freeze-summer coolant additives:
Now this is very important, to go into exact details would take pages and pages to explain.
Simply its very crucial that the correct type and quantity is added, its aids in raising the boiling point and prevents corrosion, if you live in a hard water area then use distilled water.

Adding too mush additive can also be detrimental to your engine, always follow what the manufacturer specifies and do your self a favour, keep away from cheap anti freeze brands that are unknown, here in SA we have a large selection of both quality and cheap, the cheap stuff is known to cause damage to plastic's within the cooling system, I've seen this for myself.

Below pictures are form a P38, this is common and so over looked.


Below pics:
Just removed from a Range Rover that had a leaking transmission cooler..
Upon further investigating other coolers had to be removed for cleaning as they were seriously blocked.
With the coolers looking like this serious damage to both engine and transmission will occur and worst part is to see all this a complete strip down is required.


Front of radiator (Not visible when in place)
Radiator should be replaced but there is no stock at present so it will be sent in for professional cleaning and minor repair to the top little pipe that always breaks off. (protection shield coming soon)


Fan side, you wouldn't have thought it would be blocked up...
There's a transmission cooler there somewhere.
These are becoming a problem on older P38s
If you see the bottom of the radiator and it looks oily wet then further investigating is required.

Another blocked radiator, the transmission cooler again looked like the picture above and at the time of replacing the radiator (new) around the begining of 2010 it all looked ok, just goes to show how quick a leaking transmission cooler can block up a new radiator, dust over a short period will stick to the leaking oil and build up, as it blocks up the oil is sucked through areas of the radiator that is free and so on until, it totally blocks up.


From a L322......

Drained coolant from a L322 and this was after 3 flushes, it took another 3 more to clear the system completly.
it looks as if another brand of anti freeze was added to the cooling system which caused this milky mix.
NEVER MIX ANTI FREEZE BRANDS due to chemical reactions that will cause severe damage to your motor /cooling system

06 March 2010

Cruise control.


The joys of using cruise control........................ and then it fails

The system uses 3 primary components to engage cruise control.
1. The Vac pump unit attached to the EAS box.
2. Two electronic modules located on right side under lower dash trim.

Rarely do all three items go but it can and does happen, to date I've had to replace all three components on two Range Rovers P38's, the usual problem with a non functioning CC is cracked piping on the system.
This pipe runs from the Vacuum pipe to the brake pedal where it is attached via a vacuum breaker switch.
The pipe ends crack (due to age) on both ends, also note that on the Vacuum pump end the pipe is split into an additional two more shorter pipes, these two need inspecting, any sign of cracks in the piping requires replacement using a suitable thick walled rubber pipe, a good quality fuel hose usually works well.


Pictures of the Electronic modules to follow soon


Ignition coils (GEMs) and not what to do

Ah the ignition system.......
At some point you are going to pick up an ignition related problem of sorts, be it HT leads (The wires that go to the spark plugs) injectors (Very rarely go) and so on.

UPDATE:
So I've been tinkering with coils recently, my local electronic ECU repair station reckons Hyundai coils are the same, I managed to get 4 for testing purposes on a customers car.....mmmm bad move and they blew at around 500 km's of use so don't go the Hyundai route.

Without going into details of wasted spark technology I'll let the pictures do the talking!

We have brand new coil packs in stock.
Loose single coils R900
Complete coil packs R2870


Coils can easily be replaced once coil pack has been removed
Later models use the square Bosch coil pack and there are two of them.

Bodge repairs, no Low/High range selection

Bodge jobs, this is the kind of repair that makes me fume.
Owners as well as repairers take short cuts, the P38 is no vehicle to try this sort of short cut repairs.
Its way to complex with an array of computers to try it and when bodge jobs are done the results are worse than a open heart operation, the time it takes to sort out a major bodge job can be days on end........

In the pictures below is a typical bodge job repair, I was informed that it was carried out by a qualified LR mechanic, Some how I doubt he was a LR mechanic let alone a mechanic at all.


At all the repairs were carried out the Range selector still didn't work so more digging into the workshop manual was needed, what seemed to take forever actually didn't and within 5 mins I had a solution to the problem
To cut a long story short the speed pick up on the transfer box had gone open circuit, in other words it was faulty, slapped in a 2nd part to confirm and by George I now had low and high range operating like it should


The faulty part:
A simple but very important piece of the puzzle, it prevents you selecting while the vehicle is in motion above a certain speed, 5kph I think


03 March 2010

Sunroof

A better update to the this section is near, in the meantime please note that if you remove the sunroof motor there is a special way to synchronize it if you have manually turned it once removed, the RAVE manual does give a good description of the procedure and is important, if you don't you will cause serious damage to the sunroof rails, these rails are becoming scarce and are darn pricey.
 
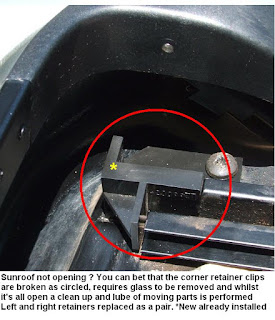
Most of the time when your sunroof stops working it's because a plastic clip to the front, mounted on each side breaks.
The clips are available (I carry a set of 3) from Land Rover at a reasonable price.
Replacement requires sunroof glass to be removed and at the same time inspection and lubrication of moving parts is ideal.
When lubricating these parts use a silicon based spray, anything heavier seems to gum things up and tends to cause more problems, the rails are made of aluminium and so are some of the other parts.
The bits that break causing your sunroof to tilt open on one side are made of plastic and are not repairable in any way.
The only solution here is a total removal of the sunroof mechanism to determine what went wrong, most of the time its quicker and cheaper to source a good second hand mechanism from a breakers yard.


 On the subject of sunroofs there is a couple of weak points like leaks.
The drain tubes are well secured but where they terminate at the drain end is a concern point.
The clear plastic pipe is merely popped into the rubber tip end, this drain piece blocks up and
yes you get the picture, water starts entering the car.

However a simple snip off the ends, securing properly into drain end with tape will ward off any
future blockage (see pic below)

17 February 2010

Fuse box info and relays, new update with latest easy mod to prevent damage

Update on the below proposed update.... its been slow but its coming to this blog soon.

UPDATE to follow on how to remove and supply the 3 BeCM wires that attach to the bottom of the fuse box with its own dedicated power supply, these fuse box's are over loaded and is a design fault.
Mod will detail a separate 3 link fuse connection, its very possible that this mod will solve a few current supply issues like odd ABS, dash dials odd behavior etc 

The handbook lists all the fuses but nothing on the relays


RL means relay
Be advised that you can use basic relays that are available from auto electrical suppliers or spare shops BUT a quality brand like Siemens, Bosch is highly recommended, speak to a auto electrician if in doubt. 

1   RL18 AC control relay
2   RL13 AC condenser fan 1

3   RL11 Head lamp wash wipe

4   RL8 Front wiper interval relay

5   RL1 Front wiper control relay

6   RL19 Engine main control relay

7   RL14 AC condenser fan 2

8   RL2 ABS power relay

9   RL 20 EAS compressor relay

10 RL15 Ignition coils, MAF sensor  **Important relay**

11 RL4 Right heated front screen

12 RL16 Starter relay

13 RL5 Left heated front screen

14 RL17 ABS pump **Don't mess with this one, buy genuine if in doubt - Do not modify a  standard relay to fit as contacts will fuse and will burn out your ABS pump**

15 RL6 Right blower motor

16 RL12 Fuel pump relay

17 RL7 Left blower motor

18 RL9 Hooter relay

Apart from the ABS pump relay being black DO NOT install other black relays within the fuse box
The yellow and green relays are different by pin design compared to relays bought over the counter from spares shops

The ABS relay is a special double contact design due to the start up current of 70 amps going through it, you must replace this relay with the correct one from Land Rover as these too are not available elsewhere


Maxi Fuses supply the BeCM with power

3 cables secured onto the underside of fuse box go to the BeCM

The slot “Not used” is normally populated with a spare relay.


REPAIRING THE FUSE BOX:

It is possible to carry out repairs to the fuse box but a simple fault like a bad relay can lead you to believe it is the fuse box, a relay can still click and show ok when testing but is another situation when a load goes through its internal contacts

None the less a fuse box can go wrong and is repairable, I've done a few with good results even though they are a pain to do
Below are a few pictures just so you can see how complex they are, its a well built unit using lots of thick copper


The stripping process is easy as to is the splitting the two halves, its the reassembling that takes most of the time with re soldering in new connection joiners, takes around 5 hours non stop.


NEW update from here
A few more pics to be added very shortly on how to repair the above burnt main battery cable connection with the use of a starter motor solenoid copper bolt, this allows for good soldering and wide spread support of current flow.


In the above picture on the left is the original power post in the fuse box, to the left is the starter motor solenoid copper bolt that is used in the repairs of the fuse box.


The above fuse box would in most cases been deemed throw away, this one was so bad I decided to give it a try and the results were positive.


Above pic is to show how the lug needs to be bent to allow for the plastic cover to fit, minor enlargement of the hole is required.


To add the new mod two holes barely larger than the solid core copper cable being used needs to be drilled through the PC board and soldered (As illustrated above circled in red)
The cabling used is normal house electrical sections, preferably the thicker type used for geyser power supply as its rated a higher current resulting in it being thicker and ideal.
This add on can be done without splitting the board sections and a must do even on a brand new fuse box 

Its the way these fuse/relay boxes should of been manufactured in the first place......


Interesting that something so basic to make up can have a major impact on current spread, we now carry out this mod to all fuse boxes we repair, better than new and I'm surprised the manufacturers don't do the same...oh wait, if they did they would not be selling fuse boxes

Relays...

New update added in May 2015, engine power

Pics on ABS pump relay and other relays within the fuse box opened for all to see regarding why cleaning up the contacts can have a positive effect


P38 ABS relay, this one fused and caused the ABS pump to burn out

Standard relay, please do not modify one of these for use as a ABS relay, it will fuse together and burn out the ABS pump - Guaranteed and I've seen it happen, do not simply let anyone replace or service the braking system on the P38 if they don't specialize on these vehicles.
Apart from WILLIAMS 4X4 I know of nobody else here in South Africa 

Standard relays can be cleaned up nicely, use fine 1000 grit sand paper, good for another life time.


01 February 2010

Brake Fluid reservoir. A must read for every owner

This info is applicable to Range Rover Classics with ABS system and ALL P38 models

Click on pictures for a larger, detailed view

Recently after noticing a sudden surge in ABS pump replacements I decided to investigate what was going on, age and mileage seems to play a role here but something wasn't right and here's my findings detailed below, bare in mind different operating conditions throughout the world vary.....

Fault 1: Dark brownish clear brake fluid means its old and fluid has not been changed in a long long time.
Replace fluid and bleed complete braking system, requires around 4 liters of DOT 4 brake fluid

Fault 2: Dark brown but not clear indicates dirt within fluid and urgent replacement of fluid is needed.

Fault 3: Black fluid, probably never changed since it was sold off the show room floor, lets hope the internals
of the brake modulator are tougher than they look, they are not repairable for liability reasons and parts are not available.

Brake fluid must be replaced every two years as a routine, more often at least once a year if used in severe conditions.

Brake fluid is designed to prevent boiling, prevent rust and it aids in lubrication of moving parts..... but not for long as the fluid breaks down.


The above was removed from a 1999 brake modulator.
Concerned, then the safest bet would be to replace.
Use a good quality DOT 4 brake fluid


More details with screen filter removed

The below picture is typical of bad brake fluid from these vehicles and its way to regular that I see this


This is the filler neck, a clear indication that the reservoir must be replaced


Recently I have been contacted with a clean out process I have tried, although it works well to some degree depending on age and state I still prefer to replace with new. So much so that I have replaced mine with new, no point in suggesting something if I don't do it myself for a reason.

ABS Total strip down to follow showing all the bits and bobs for all to see (In progress)

First up to this addition on new info is the dreaded ABS pump relay, as you will see from the pictures the contact pads are burnt, these relay caused a perfectly good ABS pump to burn out, so whats going on....

Well for starters the ABS pump demands rougly around 70amps at start up, when the pads make contact there is whats knowing are arcing on the contact pads, as you can see there are two but one pad will always make contact first, this is the start to a fusing relay, one that will jam and make the ABS pump run continously and burn out.

So whats the solution, at present on the work bench I run a few cycles with the same type of relay and load, the relay cover has been removed so I can see in real time whats going on and its like lightening on those pads.

I have from the begining believed that a capacitor or lets call it a condensor for the guys who are familiar with "Points and condensors" (on non electronic distrubutors) to be the solution and it seems to be working to a large degree but final tweaking to the correct cap in near, the final leg of this minor but important mod is a few days away with easy instructions on how to install the cap.

In the meantime......


Then some brake modulator pics (to be edited)